
How to Make Your Own Knife: A Step-by-Step Guide
.jpg)
Introduction
Making your own knife is one of the most rewarding DIY projects. Whether you want a survival knife, kitchen knife, or hunting blade, crafting one from scratch allows you to create a tool that perfectly suits your needs. This guide will walk you through the process in a simple, easy-to-follow manner. We’ll cover everything from selecting the right steel to heat treatment, sharpening, and final polishing. Let’s dive in!
1. Choosing the Right Steel

The quality of your knife depends heavily on the steel you use. Some of the best options include:
1095 High Carbon Steel – Excellent edge retention but requires maintenance to prevent rust.
D2 Steel – High wear resistance and durability, perfect for long-term use.
Stainless Steel (440C, VG10, or S30V) – Corrosion-resistant and ideal for kitchen or outdoor knives.
Tool Steel (O1, A2) – Popular among knife makers for its toughness.
When selecting steel, consider the purpose of your knife. For example, a chef’s knife requires stainless steel, while a hunting knife benefits from high-carbon steel.
2. Gathering the Right Tools
To make a knife from scratch, you’ll need some essential tools:
Angle grinder or hacksaw (for cutting steel)
Belt sander or files (for shaping and beveling the blade)
Drill and bits (for making handle pin holes)
Forge or torch (for heat treatment)
Quenching oil (for hardening the blade)
Sandpaper (200-2000 grit) (for polishing)
Epoxy and clamps (for attaching the handle)
Wood, Micarta, or G10 (for handle material)
Sharpening stones (for finishing the edge)
Protective Gear (Gloves, safety glasses, and a respirator)
3. Designing Your Knife
Before cutting your steel, sketch a design
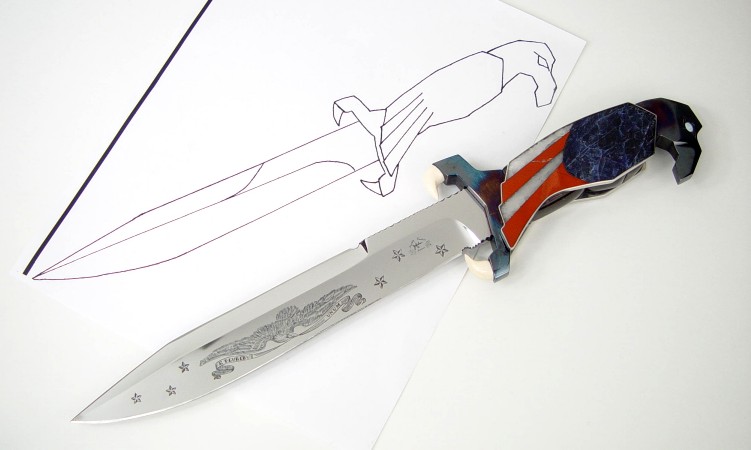
of your knife on paper. Consider:
Blade Shape – Drop point, tanto, or clip point?
Blade Length – Short for everyday carry (EDC) or long for heavy-duty use?
Handle Ergonomics – Comfortable grip is key.
Full Tang or Hidden Tang – Full tang offers strength, while hidden tang looks sleek.
Once satisfied with your design, transfer it onto your steel using a marker or scribe.
4. Cutting and Shaping the Blade
Step 1: Cutting the Steel
Use an angle grinder or hacksaw to cut out the rough shape of your blade. Take your time to follow the design closely.
Step 2: Shaping the Blade
With a belt sander or file, refine the shape of your knife. Remove excess material, smooth edges, and prepare for beveling.
Step 3: Grinding the Bevel
The bevel is the angled edge of your blade that leads to the sharp cutting edge. You can:
Use a belt sander for precision.
File manually if you don’t have power tools.
Grind at a consistent angle (15-25 degrees) and take breaks to avoid overheating.
5. Drilling Holes for the Handle
If your knife will have a handle, mark and drill holes for the pins. This ensures a secure fit when attaching the scales later.
6. Heat Treatment
To harden your blade and improve durability, heat treatment is crucial.
Step 1: Heating
Heat the blade evenly in a forge or with a torch until it reaches a glowing red (around 1500°F or non-magnetic).
Step 2: Quenching
Quickly submerge the blade in warm oil (canola or motor oil) to harden it.
Step 3: Tempering
Place the knife in an oven at 375-450°F for 1-2 hours to reduce brittleness.
Let the blade cool slowly to maintain flexibility.
7. Finishing the Blade
After heat treatment, refine the blade:
Use sandpaper (start at 200 grit, progress to 2000 grit) to polish the blade.
Remove oxidation and scratches.
Add a satin or mirror finish depending on your preference.
8. Making and Attaching the Handle
Step 1: Choosing Handle Material
Popular options include:
Wood – Classic look, but requires sealing.
Micarta – Durable and water-resistant.
G10 – Extremely tough synthetic material.
Step 2: Shaping the Handle
Cut your handle material to size.
Drill holes to align with the blade’s tang.
Step 3: Attaching the Handle
Apply epoxy and attach scales.
Insert pins or bolts for extra security.
Clamp and let cure for 24 hours.
Step 4: Shaping and Sanding
Use a file or belt sander to contour the handle.
Sand progressively (80-1000 grit) for a smooth grip.
9. Sharpening the Blade
Your knife is almost done! Now it’s time to sharpen it.
Use a whetstone (start with 400 grit, progress to 1000-3000 grit).
Maintain a consistent angle (15-20 degrees per side).
Use light, even strokes for a razor-sharp edge.
Finish with a leather strop for extra polish.
.jpg)
10. Final Touches and Testing
Step 1: Cleaning and Oiling
Wipe down the knife to remove debris.
Apply a thin layer of oil (mineral or gun oil) to prevent rust.
Step 2: Testing the Knife
Test sharpness on paper or rope.
Ensure a comfortable grip and balance.
Make adjustments if necessary.
11. Knife Maintenance and Care
To keep your knife in top condition:
Regularly clean and dry the blade after use.
Store in a dry place to prevent rust.
Hone the edge frequently and sharpen when needed.
Avoid using the knife for unintended purposes (e.g., prying, hammering).


Conclusion
Making your own knife is a satisfying and practical skill. Whether for outdoor use, kitchen tasks, or as a collectible, a handmade knife adds a personal touch to your gear. With patience and practice, you can craft a high-quality knife that lasts a lifetime.
Start with simple designs, experiment with different materials, and refine your techniques. As you gain experience, you’ll develop your own unique knife-making style.
Happy knife-making!
.webp)


No comments:
Post a Comment